Deploying BentoML Using Airflow
Last Updated
Share

Written By Sarah Floris
Motivation#
Many data scientists know how to train and optimize their models. However, getting those models into production is a different story. These models must preprocess data, train, deploy, and then handle the scale of the requests.
BentoML addresses these problems by providing easy integration into Dockerfiles, Kubernetes, and the like. It also easily allows you to retrain your bento model as part of an Airflow orchestration step and then deploy the newly created model.
I will not focus on optimizing the model during training located on the Keras page. Instead, I want to focus on integrating Airflow and BentoML to create a DAG to train (or re-train) and then serve this newly trained model.
Feel free to follow along with the code.
A Quick Introduction To BentoML#
BentoML is a Python, open-source framework that allows us to quickly deploy and serve machine learning models at scale from PyTorch, Scikit-Learn, XGBoost, and many more.
We can run the BentoML models in adaptive batching or parallel. In adaptive batching, we can combine a bunch of real-time requests and run them. Additionally, we could combine multiple different models by running them in parallel.
Deploying models can be done via a customizable BentoML Runner. The key to these runners is that we can execute them independently, adjusting the type of processing units(CPU, TPU, GPU) and the sizing of these units. We will see those runners in action today when predicting movie ratings.
BentoML’s website contains more information [1].
Training The Bento Model To Recommend Movies#
In the airflow/dags/train.py file, we will download the movielens dataset, use user-to-user collaborative filtering, implement a gradient descent found on Keras’s website[2], and then combine all of that in a simple function that we can call from Airflow as a DAG.
Take a look here for more info about collaborative filtering[3] and here for gradient descent[4].
In this example, we will recommend movies using these three steps:
1. Both users and movies are mapped to IDs using a 50-dimensional vector via an embedding matrix.
2. We will then compute the dot product between these two vectors that will result in the rating for that movie.
3. Lastly, we will use gradient descent to train the user and movie embeddings.
class RecommenderNet(keras.Model):
    def __init__(self, num_users, num_movies, embedding_size, **kwargs):
        super().__init__(**kwargs)
        self.num_users = num_users
        self.num_movies = num_movies
        self.embedding_size = embedding_size
        self.user_embedding = layers.Embedding(
            num_users,
            embedding_size,
            embeddings_initializer='he_normal',
            embeddings_regularizer=keras.regularizers.l2(1e-6),
        )
        self.user_bias = layers.Embedding(num_users, 1)
        self.movie_embedding = layers.Embedding(
            num_movies,
            embedding_size,
            embeddings_initializer='he_normal',
            embeddings_regularizer=keras.regularizers.l2(1e-6),
        )
        self.movie_bias = layers.Embedding(num_movies, 1)

    @tf.function
    def call(self, inputs):
        user_vector = self.user_embedding(inputs[:, 0])
        user_bias = self.user_bias(inputs[:, 0])
        movie_vector = self.movie_embedding(inputs[:, 1])
        movie_bias = self.movie_bias(inputs[:, 1])
        dot_user_movie = tf.tensordot(user_vector, movie_vector, 2)
        # Add all the components (including bias)
        x = dot_user_movie + user_bias + movie_bias
        # The sigmoid activation forces the rating to between 0 and 1
        return tf.nn.sigmoid(x)
We will initialize the model,
model = RecommenderNet(num_users, num_movies, EMBEDDING_SIZE)
model.compile(
        loss=tf.keras.losses.BinaryCrossentropy(), optimizer=keras.optimizers.Adam(learning_rate=0.001),
    )
fit the model,
history = model.fit(
        x=x_train,
        y=y_train,
        batch_size=64,
        epochs=5,
        verbose=1,
        validation_data=(x_val, y_val),
    )
and lastly, save the model.
If you are working on the same bento server, you can easily save the BentoML model in the filesystem like this:
bentoml.tensorflow.save_model('addition_model', model, signatures={"__call__": {"batchable": True}})
And load it back in using:
bentoml.keras.load_model('addition_model')
and then move it to the desired location. Additionally, we could save the model directly to an s3 storage:
bentoml.models.export_model('addition_model:latest', 's3://models/my_model.bentomodel')
For the final function[2],
def train_model(**kwargs):
    curr_dir = Path(__file__).parent
    movielens_dir = os.path.join(curr_dir, 'ml-latest-small')
    if not os.path.exists(movielens_dir):
        movielens_data_file_url = (
        'http://files.grouplens.org/datasets/movielens/ml-latest-small.zip'
        )
        req = requests.get(movielens_data_file_url)
        print('Downloading Completed')

        file = zipfile.ZipFile(BytesIO(req.content))
        file.extractall(curr_dir)

    ratings_file = os.path.join(movielens_dir, 'ratings.csv')
    df = pd.read_csv(ratings_file)

    user_ids = df['userId'].unique().tolist()
    user2user_encoded = {x: i for i, x in enumerate(user_ids)}
    userencoded2user = {i: x for i, x in enumerate(user_ids)}
    movie_ids = df['movieId'].unique().tolist()
    movie2movie_encoded = {x: i for i, x in enumerate(movie_ids)}
    movie_encoded2movie = {i: x for i, x in enumerate(movie_ids)}
    df['user'] = df['userId'].map(user2user_encoded)
    df['movie'] = df['movieId'].map(movie2movie_encoded)

    num_users = len(user2user_encoded)
    num_movies = len(movie_encoded2movie)
    df['rating'] = df['rating'].values.astype(np.float32)
    # min and max ratings will be used to normalize the ratings later
    min_rating = min(df['rating'])
    max_rating = max(df['rating'])

    print(
        'Number of users: {}, Number of Movies: {}, Min rating: {}, Max rating: {}'.format(
            num_users, num_movies, min_rating, max_rating,
        ),
    )
    df = df.sample(frac=1, random_state=42)
    x = df[['user', 'movie']].values
    # Normalize the targets between 0 and 1. Makes it easy to train.
    y = df['rating'].apply(
        lambda x: (x - min_rating) /
        (max_rating - min_rating),
    ).values

    x_train, x_val, y_train, y_val = train_test_split(x, y, test_size=0.33)

    model = RecommenderNet(num_users, num_movies, EMBEDDING_SIZE)
    model.compile(
        loss=tf.keras.losses.BinaryCrossentropy(), optimizer=keras.optimizers.Adam(learning_rate=0.001),
    )
    history = model.fit(
        x=x_train,
        y=y_train,
        batch_size=64,
        epochs=5,
        verbose=1,
        validation_data=(x_val, y_val),
    )
    bentoml.tensorflow.save_model('addition_model', model, signatures={"__call__": {"batchable": True}})
We can now schedule this function as an Airflow task to train this model, but first, I will walk us through how to set up airflow’s standalone version.
Setting Up Airflow#
If you do not have an easily accessible airflow server installed, here is a quick way to get a local version up and running.
# Airflow needs a home. `~/airflow` is the default, but you can put it
# somewhere else if you prefer (optional)
export AIRFLOW_HOME=~/airflow

# Install Airflow using the constraints file
AIRFLOW_VERSION=2.3.2
PYTHON_VERSION="$(python --version | cut -d " " -f 2 | cut -d "." -f 1-2)"
# For example: 3.7
CONSTRAINT_URL="https://raw.githubusercontent.com/apache/airflow/constraints-${AIRFLOW_VERSION}/constraints-${PYTHON_VERSION}.txt"
# For example: https://raw.githubusercontent.com/apache/airflow/constraints-2.3.2/constraints-3.7.txt
pip install "apache-airflow==${AIRFLOW_VERSION}" --constraint "${CONSTRAINT_URL}"

airflow standalone
The bash script will set up the database, make a user (and give you the password!), and start it all. Afterward, you can access the UI by accessing localhost:8080 and using the admin user with the password shown during setup.
Regardless of where you have installed airflow, put the dag into the directory listed in airflow.cfg or change the directory to point to the DAGs folder.
Training The Bento As Part Of An Airflow DAG#
Airflow files consist of DAGs, a Directed Acyclic Graph that contains tasks. We will initialize our DAG with the name “movie-recommendation-train,” which shows up on the Airflow UI. You can find this code in airflow/dags/train_dag.py.
with DAG(
    'movie-recommendation-train',
    # These args will get passed on to each operator
    # You can override them on a per-task basis during operator initialization
    default_args={
        'depends_on_past': False,
        'email_on_failure': False,
        'email_on_retry': False,
        'retries': 1,
        'retry_delay': timedelta(minutes=5)
    },
    description='Recommendation training',
    schedule_interval=timedelta(days=1), #you can change this cadence.
    start_date=datetime(2021, 1, 1),
    catchup=False,
    tags=['staging'],
) as dag:
I created this DAG to train the bento model solely, so I use one task that will train the model. And in this task, I will use the PythonOperator, which allows me to run any Python function; I will use the function I created in airflow/dags/train.py.
PythonOperator(
 task_id='training_model',
 python_callable=train_model,
 )
And here is the airflow UI with a successful DAG run.
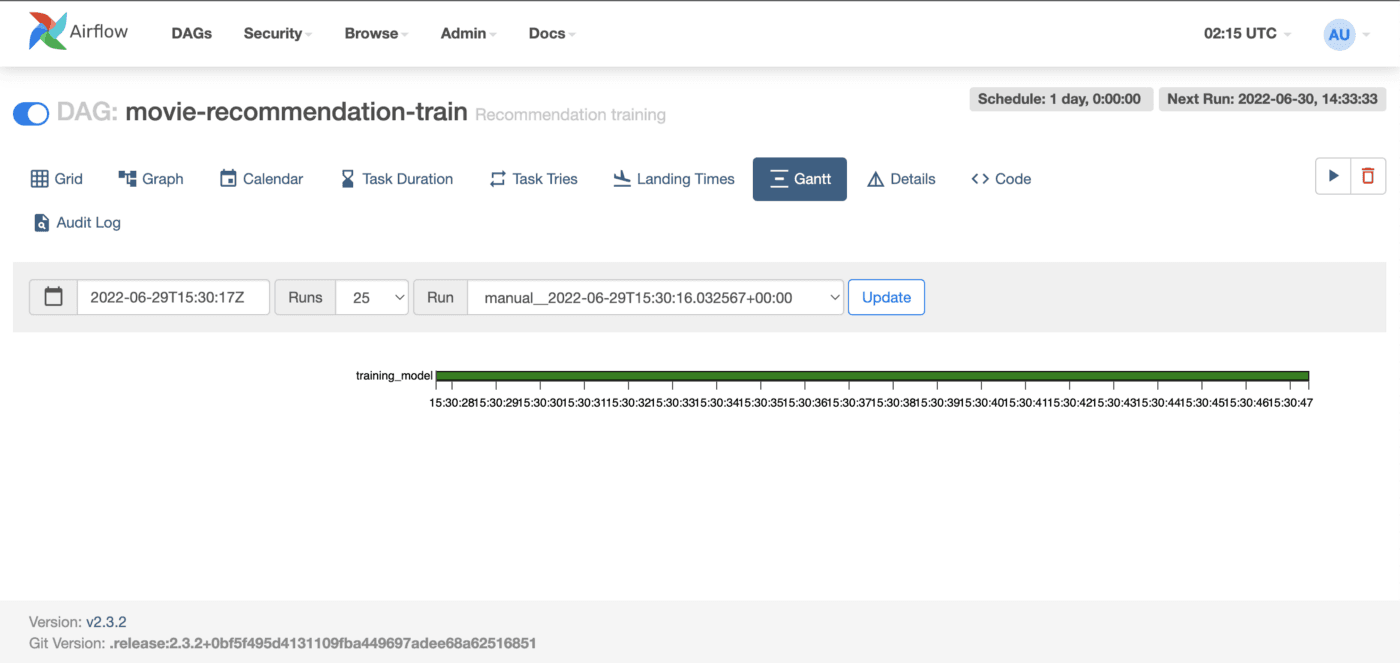
We will have a newly trained model that will run successfully in Airflow.
We’ve just finished training this model with a few movies and would like to know what movie we can recommend to the user “1”.
Testing The Prediction Function#
Because the training finished on the same bento server, we can quickly load that model.
model = bentoml.keras.load_model('addition_model:latest')
Otherwise, you can move the exported model to a directory you can reach.
model = bentoml.keras.load_model('addition_model:latest')
Then, we can load it as a runner and register it with the service.
runner = bentoml.tensorflow.get('addition_model:latest').to_runner()
svc = bentoml.Service('movie_recommender', runners=[runner])
This service will provide us with an interface to create interactive requests. These interactive requests are input from the user, so I implement a pydantic model to enforce the user’s input to our function.
class User(pydantic.BaseModel):
    user_id: int

user_input = JSON(
    pydantic_model=User,
    validate_json=True,
)
Enforcing our user’s input provides us with the security to ensure that our function can process their input. As part of the decorator, we will use the enforced-schema input and enforce the expected JSON output. Even though the API is only set up for one route right now, we could set it up for multiple routes. Thus, we have focused on providing the top 10 recommendations for a specific user.
The function that we will use:
@svc.api(
    input=user_input,
    output=JSON(),
    route='',
)
def classify(kf_input: User) -> json:
    user_id = kf_input.user_id
    movies_watched_by_user = df[df.userId == user_id]
    movies_not_watched = movie_df[
        ~movie_df['movieId'].isin(movies_watched_by_user.movieId.values)
    ]['movieId']
    movies_not_watched = list(
        set(movies_not_watched).intersection(set(movie2movie_encoded.keys())),
    )
    movies_not_watched = [
        [movie2movie_encoded.get(x)] for x in movies_not_watched
    ]
    user_encoder = user2user_encoded.get(user_id)
    user_movie_array = np.hstack(
        ([[user_encoder]] * len(movies_not_watched), movies_not_watched),
    )
    ratings = runner.run(user_movie_array).flatten()
    top_ratings_indices = ratings.argsort()[-10:][::-1]
    recommended_movie_ids = [
        movie_encoded2movie.get(movies_not_watched[x][0]) for x in top_ratings_indices
    ]
    print(f'Showing recommendations for user: {user_id}')
    print('====' * 9)
    top_movies_user = (
        movies_watched_by_user.sort_values(by='rating', ascending=False)
        .head(5)
        .movieId.values
    )
    print('Top 10 movie recommendations')
    print('----' * 8)
    recommended_movies = movie_df[
        movie_df['movieId'].isin(
            recommended_movie_ids,
        )
    ]
    for row in recommended_movies.itertuples():
        print(row.title, ':', row.genres)
    return {'Recommendations': top_movies_user}
I know this is a very long function so we will walk through it piece by piece.
Starting from the top, we first need to filter out the user_id’s movies that were watched and not watched.
movies_watched_by_user = df[df.userId == user_id]
    movies_not_watched = movie_df[
        ~movie_df['movieId'].isin(movies_watched_by_user.movieId.values)
    ]['movieId']
Then, we need to ensure that the movies the user did not watch go through a similar process to clean them and then predict their ratings.
movies_not_watched = list(
        set(movies_not_watched).intersection(set(movie2movie_encoded.keys())),
    )
movies_not_watched = [
        [movie2movie_encoded.get(x)] for x in movies_not_watched
    ]
user_encoder = user2user_encoded.get(user_id)
user_movie_array = np.hstack(
        ([[user_encoder]] * len(movies_not_watched), movies_not_watched),
    )
We predict the ratings for the list of movie_ids that the user did not see and flatten the returned np.ndarray,
ratings = runner.run(user_movie_array).flatten()
sort these values from highest to lowest rating,
top_ratings_indices = ratings.argsort()[-10:][::-1]
and decode the movie ids so we can get the title and genres.
recommended_movie_ids = [
        movie_encoded2movie.get(movies_not_watched[x][0]) for x in top_ratings_indices
    ]
From these ratings, we will print out the user’s top 10 recommendations with the titles and genres.
print(f'Showing recommendations for user: {user_id}')
print('====' * 9)
print('Top 10 movie recommendations')
print('----' * 8)
recommended_movies = movie_df[
            movie_df['movieId'].isin(
            recommended_movie_ids)
    ]
for row in recommended_movies.itertuples():
     print(row.title, ':', row.genres)
Those are the same recommendations we will return to the request.
return {'Recommendations': recommended_movies}
We need to tell the server what it needs to deploy the model to the server. I used a copy of the bentofile.yaml from the gallery folder in BentoML’s repository.
My current file looks like this:
service: "service.py:svc"
labels:
  owner: bentoml-team
  project: gallery
include:
- "*.py"
python:
  packages:
    - scikit-learn
    - pandas
    - pydantic
    - tensorflow
    - keras
It tells the bento server who is the owner of the project, the project names, the packages, which files to include, and lastly, the service name, which will consist of the filename:name of the service found in the service.py.
Now we are ready to build.
Deploying The Model To The BentoML Server#
Because we are working locally, we can build and save the bento in the local repo.
In the terminal, we will enter the right directory:
cd < the path to the directory >/bentoml
Then, we build the model
bentoml build
or you can build it outside of the directory by adding the -f argument:
bentoml build -f ./path/to/project/bentofile.yaml ./path/to/project/
What I love the most about Bentoml is that all it takes to deploy is this simple command:
bentoml serve
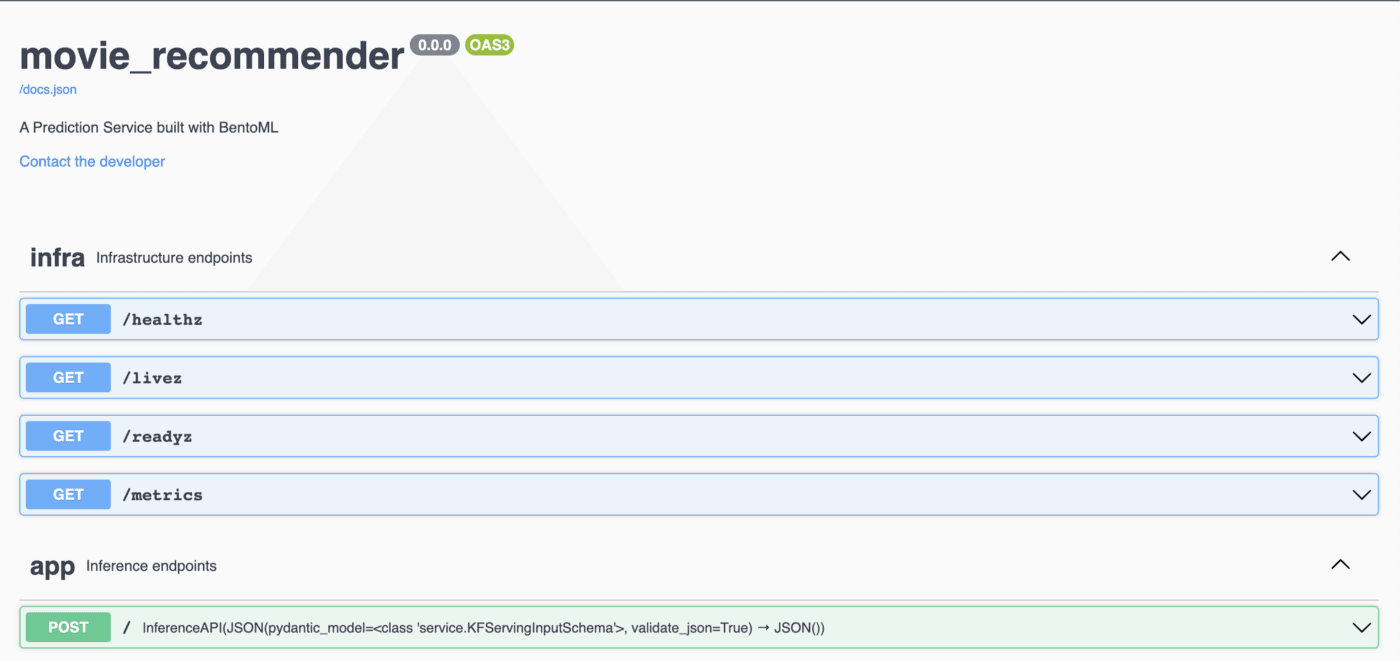
When you access http://127.0.0.1:3000/#/ now, you will see this UI:
We can then quickly request the top 10 movies that we will recommend by sending a POST
curl -X POST -H \
  "content-type: application/text" \
  --data '{"user_id": 1}' \
  http://127.0.0.1:3000/
returning the following JSON that we can use.
{
  "Recommendations": {
    "movieId": {
      "277": 318,
      "507": 589,
      "704": 922,
      "896": 1193,
      "906": 1204,
      "922": 1221,
      "926": 1225,
      "951": 1252,
      "975": 1276,
      "2462": 3275
    },
    "title": {
      "277": "Shawshank Redemption, The (1994)",
      "507": "Terminator 2: Judgment Day (1991)",
      "704": "Sunset Blvd. (a.k.a. Sunset Boulevard) (1950)",
      "896": "One Flew Over the Cuckoo's Nest (1975)",
      "906": "Lawrence of Arabia (1962)",
      "922": "Godfather: Part II, The (1974)",
      "926": "Amadeus (1984)",
      "951": "Chinatown (1974)",
      "975": "Cool Hand Luke (1967)",
      "2462": "Boondock Saints, The (2000)"
    },
    "genres": {
      "277": "Crime|Drama",
      "507": "Action|Sci-Fi",
      "704": "Drama|Film-Noir|Romance",
      "896": "Drama",
      "906": "Adventure|Drama|War",
      "922": "Crime|Drama",
      "926": "Drama",
      "951": "Crime|Film-Noir|Mystery|Thriller",
      "975": "Drama",
      "2462": "Action|Crime|Drama|Thriller"
    }
  }
}
Last Words#
Using Airflow to train the model, setting up the server for Bentoml, and then implementing that server to predict movie recommendations is easy. Thank you for taking the time to read this tutorial. I hope it was beneficial to you and that it helped you learn something new. Have you seen any of the recommended movies? If not, let me know what your favorite movies are, and we can recommend ten movies with this model!
References#
[1] https://docs.bentoml.org/en/latest/tutorial.html
[2]https://keras.io/examples/structured_data/collaborative_filtering_movielens/
[3]https://developers.google.com/machine-learning/recommendation/collaborative/basics