MLOps With BentoML
Authors

Last Updated
Share

Originally posted on the Line Engineering Blog.
Introduction#
Hello! My name is Woongkyu Lee. I am part of the team that develops the Financial Data Platform at LINE. In an article I wrote in early 2021, Airflow on Kubernetes VS Airflow Kubernetes Executor – 2, I mentioned that we were planning on extending our use of Kubernetes to ML-based services. This followup article describes the model serving tools that we ended up using to implement our solution.
In my view, MLOps is a methodology, not a solution or tool. Because of this, I believe that the way to successfully implement its principles can vary depending on the nature of the business.
While there are varying views, I would break down the responsibilities of MLOps into the following categories:
• Data collection
• Data validation and preprocessing
• Feature extraction and preprocessing
• Continuous learning
• Infrastructure management
• Model management
• Model deployment
• Model serving
• Model evaluation and validation
• Model monitoring
Among these many components, one of the tools that implements the model serving element is an open source called BentoML, which we will discuss in this article. BentoML describes themselves as a tool which helps teams “go from trained ML models to production-grade prediction services with just a few lines of code”. Put simply, it is a tool that makes deploying models easier and faster. This leads to better service for data scientists who want to continuously deploy models, get feedback, and iteratively improve performance.
In the past, the combination of server-side engineering and the requirements to serve models made building these services difficult. This resulted in longer development cycles and increased the number of engineering resources required. This problem was worth focusing on because if we reduced the amount of time developers were taking to serve and deploy models then they could focus more on business requirements. In addition, we’d be improving the efficiency of the data scientists who want to frequently develop and deploy updated models.
BentoML can solve these problems by enabling backend engineers to focus on developing business logic, and data scientists to develop and deploy model APIs.
Currently, the ML ecosystem is growing quickly with a variety of tools for different use cases, including model serving. BentoML is an open source tool for model serving which is growing rapidly in the space. There is a lot of content currently being published about BentoML. However, much of this content is related to building POCs rather than talking about how it is used in practice in a production environment. While testing BentoML’s functionality and performance, I thought about how it would hold up against a live production deployment. I’m writing this article in hopes that it will be of help to other engineers who might have the same concerns.
Why Choose BentoML?#
As I mentioned before, I believe that MLOps is a methodology with a rapidly growing ecosystem of tools. Of the model serving tools that exist, we chose BentoML because it is used widely in the industry and has a rapidly expanding ecosystem. We also found that it was easy to use and configure with our in-house ML platform. This played a big part in our decision-making process.
BentoML Functional Testing#
BentoML provides a variety of features for model serving. In this article, I will describe the various features BentoML provides and show examples of how they can be used. These are the features we tested and used during our evaluation:
- Integration with MLFlow
- Serving multiple models
- Custom URL function
- Custom input pre-processing and batch support
- Input specification
- Batch serving
- Packaging and dev environment testing capabilities
- Organization and description of package files
- Logging
- Prometheus monitoring
Integration With MLFlow#
MLFlow is one of many tools you can use to manage models. LINE’s in-house ML platform uses MLFlow as a model repository to coordinate between data scientists as part of our ML pipeline. MLFlow is a separate project and not a part of BentoML.
Our data scientists can run dozens or even hundreds of experiments by applying different algorithms when building a model. MLFlow manages the experiment history. When an adequate model is finally created, it can be registered in the repository. This can be done manually by the data scientist, or automatically so that when certain criteria are met, the model is automatically registered in the repository. Once registered, the registered model goes through a QA process divided into three stages (Production, Staging, and Archived).
The code below is an example of how we use MLFlow to coordinate our models through the various QA lifecycles.
# MLflow client 생성
import mlflow
from mlflow.tracking import MlflowClient
client = MlflowClient(tracking_uri=mlflow_endpoint)

# 모델 이름 정의
model_name="{model_name}"

# 모델 repository 검색 및 조회
filter_string = "name='{}'".format(model_name)
results = client.search_model_versions(filter_string)

for res in results:
    print("name={}; run_id={}; version={}; current_stage={}".format(res.name, res.run_id, res.version, res.current_stage))

# Production stage 모델 버전 선택
for res in results:
    if res.current_stage == "Production":
        deploy_version = res.version

# MLflow production 모델 버전 다운로드 URI 획득
from mlflow.store.artifact.models_artifact_repo import ModelsArtifactRepository
model_uri = client.get_model_version_download_uri(model_name, deploy_version)

# 모델 다운로드
download_path = "{local_download_path}"
mlflow_run_id = "{run_id}"
mlflow_run_id_artifacts_name = "{artifacts_model_name}"

client.download_artifacts(mlflow_run_id, mlflow_run_id_artifacts_name, dst_path=download_path)

# 다운로드 모델 load & predict 예시
reconstructed_model = mlflow.{framework}.load_model("{download_path}/{model_name}".format(download_path=download_path,model_name=mlflow_run_id_artifacts_name))
output = reconstructed_model.predict(input_feature)
Once the model passes the production stage, the model can be downloaded and used with BentoML to serve it as an API.
Serving Multiple Models#
BentoML can integrate with most of the major ML frameworks like Scikit-Learn, PyTorch, Tensorflow, Keras, FastAI, XGBoost, LightGBM, and CoreML. In addition you can even serve models from these different frameworks from the same endpoint. This capability was essential for us because we frequently use models from different frameworks depending on how the data scientist wants to organize the service. The business requirements may also necessitate different types of models in a workflow, which will combine the different predictions and return a final result.
The code below is an example of how I implement one particular multi-model service. You can use the @artifacts decorator to reference your models by the framework with which they were built. The models can be referenced by calling:
self.artifact.{model_artifact_name}.{framework_api}
import xgboost as xgb
import pandas as pd
import torch
import logging
from bentoml import BentoService, api, artifacts, env
from bentoml.frameworks.keras import KerasModelArtifact
from bentoml.frameworks.xgboost import XgboostModelArtifact
from bentoml.frameworks.pytorch import PytorchModelArtifact
from bentoml.adapters import JsonInput, JsonOutput
from model_api_input_validator import ModelApiInputValidator

@env(infer_pip_packages=True)
@artifacts([ # Framework별 모델 이름 지정
    KerasModelArtifact('keras_model'),
    XgboostModelArtifact('xgb_model'),
    PytorchModelArtifact('pytorch_model')
])
class ModelApiService(BentoService):

    @api(input=ModelApiInputValidator())
    def predict(self, df: pd.DataFrame):

        # API 인증 처리

        # Input Feature 전처리

        # keras_model 예측
        keras_output = self.artifacts.keras_model.predict(df)

        # xgb_model 예측
        xgb_output = self.artifacts.xgb_model.predict(xgb.DMatrix(df))

        # pytorch_model 예측
        pytorch_output = self.artifacts.pytorch_model(torch.from_numpy(df))

        # 예측 결과 후처리
        # Logging

        # 결과 Return
        return result
view raw
Using BentoML you can easily create a template class for creating additional model serving APIs in the future. The ModelApiService class above can be inherited by new services that are being created. This means that data scientists who are not as comfortable with software development can easily create new APIs that can be accessed by other services in the organization. Additionally, it saves development time and is easily integrated with existing CI/CD pipelines.
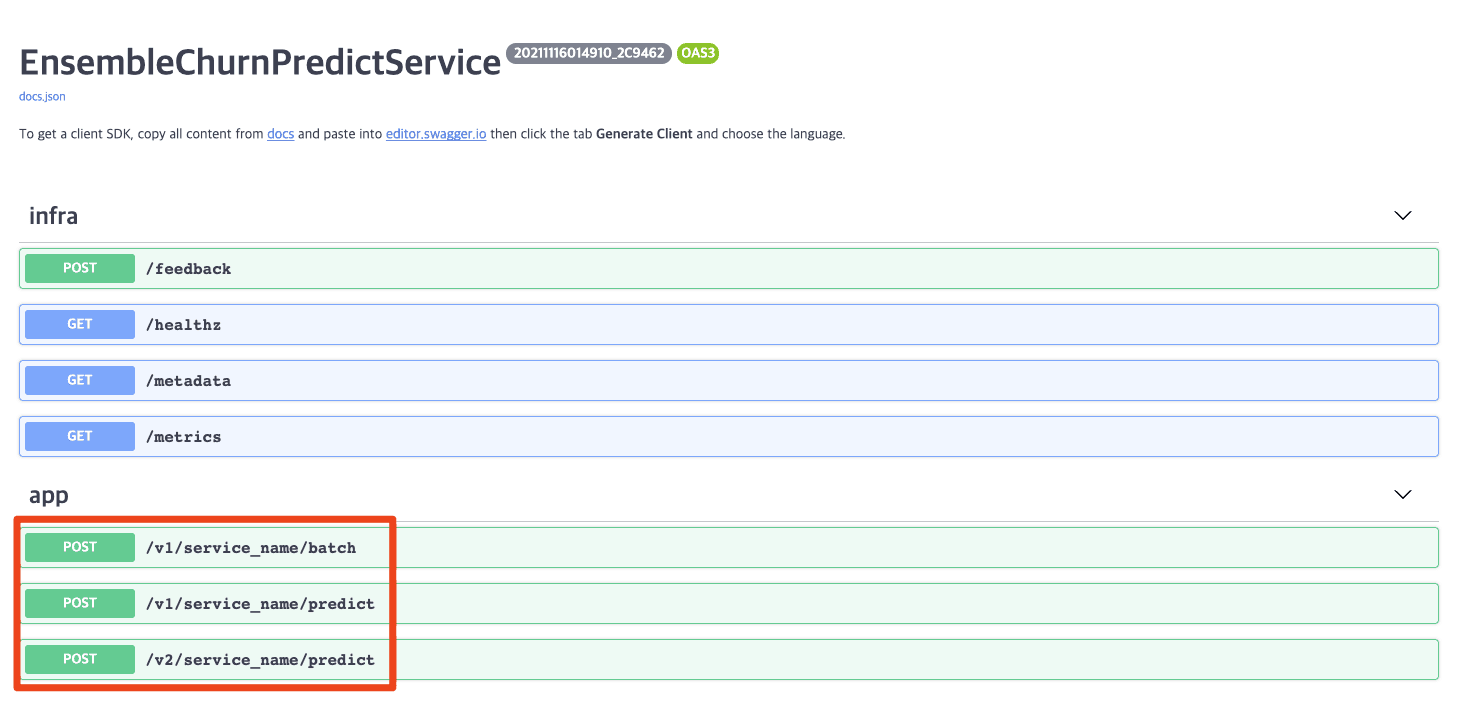
Custom URL Function#
To make the most out of your serving API, standard naming conventions should be followed so that when you need to update business logic in the future, you have the flexibility to manage different endpoints. API management in naming and versioning is an important aspect in creating a prediction service because it represents a contract with other services that may be calling for predictions.
The code below shows how to use custom URLs that can be changed with the route parameter:
@env(infer_pip_packages=True)
@artifacts([
   ...
])
class ModelApiService(BentoService):

    @api(input=ModelApiInputValidator(),
         output=JsonOutput(),
         route="v1/service_name/predict",
         mb_max_latency=200,
         mb_max_batch_size=500,
         batch=False
        )
    def predict_v1(self, df: pd.DataFrame):
     ...
        return result

    @api(input=ModelApiInputValidator(),
         output=JsonOutput(),
         route="v1/service_name/batch",
         batch=True
        )
    def predict_v1_batch(self, df: pd.DataFrame):
     ...
        return [result]

    @api(input=ModelApiInputValidator(),
         output=JsonOutput(),
         route="v2/service_name/predict",
         mb_max_latency=300,
         mb_max_batch_size=1000,
         batch=False
        )
    def predict_v2(self, df: pd.DataFrame):
     ...
        return result
By default, BentoML provides a Swagger UI where you can see and test your various prediction endpoints. The code above generates a page like this:
Custom Input Pre-Processing And Batch Support#
Out of the box, BentoML supports different types of API inputs: DataFrames, JSON, tensors, images, strings, and files. However, if additional processing or verification is required, you can create your own input type to detect and handle particular verification errors. For example, if particular validation errors must return a 200 to be retried by the client, you can add this detection in a custom input type.
The code below shows how a custom input type can convert a request body string into a JSON list and then process it into a data frame. You can also handle known exceptions with customized error handling code.
import json
import traceback
import pandas as pd
from enum import Enum
from typing import Iterable, Sequence, Tuple
from bentoml.adapters.string_input import StringInput
from bentoml.types import InferenceTask, JsonSerializable

ApiFuncArgs = Tuple[
    Sequence[JsonSerializable],
]
# 사용자 정의 ERROR CODE
class ErrorCode(Enum):
    INPUT_FORMAT_INVALID = ("1000", "Missing df_data")
    def __init__(self, code, msg):
        self.code = code
        self.msg = msg

# 사용자 정의 Exception Class
class MyCustomException(Exception):
    def __init__(self ,code, msg):
        self.code = code
        self.msg = msg

class MyCustomDataframeInput(StringInput):
    def extract_user_func_args(self, tasks: Iterable[InferenceTask[str]]) -> ApiFuncArgs:
        json_inputs = []
        # tasks 객체는 Inference로 들어온 요청
        for task in tasks:
            try:
                # task.data는 request body 데이터를 의미
                parsed_json = json.loads(task.data)
                # 예외 처리 예시
                if parsed_json.get("df_data") is None:
                    raise MyCustomException(
                        msg=ErrorCode.INPUT_FORMAT_INVALID.msg, code=ErrorCode.INPUT_FORMAT_INVALID.code
                    )
                else:
                    # batch 처리를 위한 부분
                    df_data = parsed_json.get("df_data")
                    task.batch = len(df_data)
                    json_inputs.extend(df_data)
            except json.JSONDecodeError:
                task.discard(http_status=400, err_msg="Not a valid JSON format")
            except MyCustomException as e:
                task.discard(http_status=200, err_msg="Msg : {msg}, Error Code : {code}".format(msg=e.msg, code=e.code))
            except Exception:
                err = traceback.format_exc()
                task.discard(http_status=500, err_msg=f"Internal Server Error: {err}")

        # Dataframe 변환
        df_inputs=pd.DataFrame.from_dict(json_inputs, orient='columns')

        return (df_inputs,)
from my_custom_input import MyCustomDataframeInput

@env(infer_pip_packages=True)
@artifacts([
   ...
])
class ModelApiService(BentoService):
    # Custom Input Class 사용 방법
    @api(input=MyCustomDataframeInput(),
         route="v1/json_input/predict",
         batch=True
        )
    def predict_json_input(self, df: pd.DataFrame):
     ...
        return result
In the example above, we show how BentoML can pre-process input and add relevant business logic to the service behavior. This type of custom input processing works by inheriting from the Input Adaptor abstract class BaseInputAdapter and overriding extract_user_func_args(). Looking inside each of the input adapters you can see how the BentoML converts an incoming request into the required data type. For example, the data frame input receives the request and converts it into a Pandas Dataframe. In a similar manner, the image input receives the request body and converts it into an image object using the imageio library.
BentoML also provides a micro-batching feature to improve performance. In order to use this feature you need to specify the processing logic to batch the input. If this logic isn’t provided, the service should still work at low traffic volumes, but as the volume increases you might see errors. This happens because the number of requests submitted in the batch will not match the grouped results, causing micro-batching to fail. I recently submitted a Pull Request on the BentoML GitHub project with a custom input processing example which was accepted and is now on the master branch.
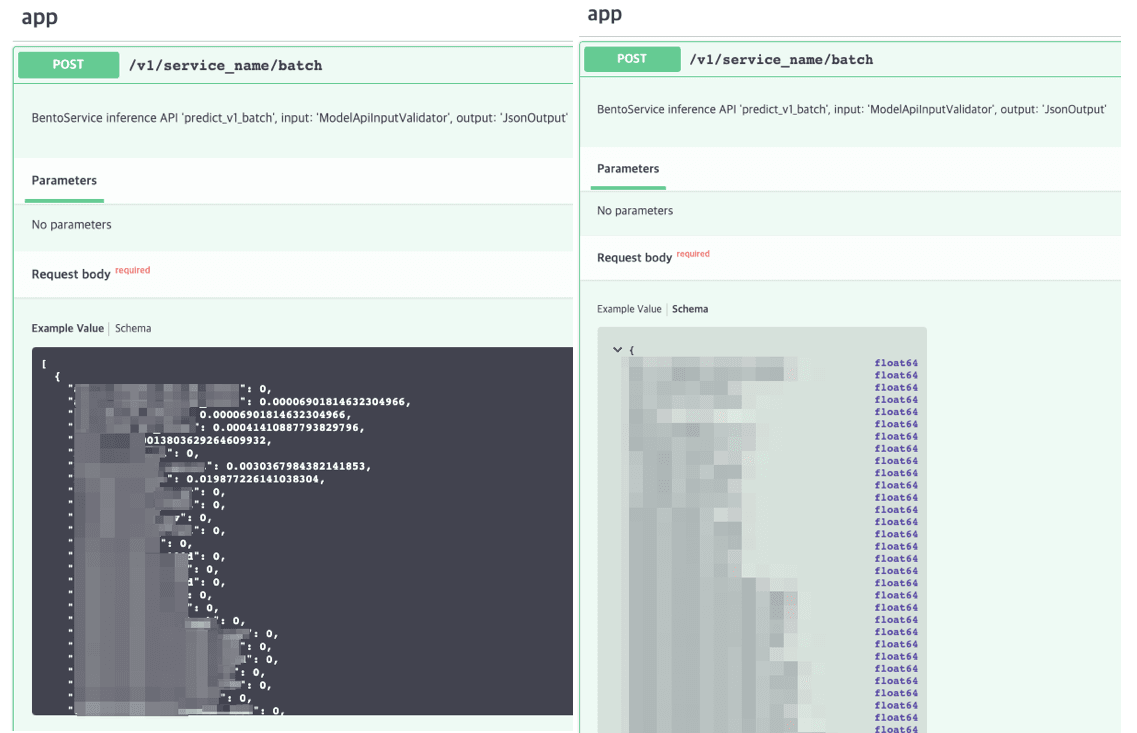
Input Specification#
In BentoML, you have the ability to specify input schemas and data types by setting metadata on the API endpoints. Once packaged, the information is readily available on the generated Swagger UI. This self-documenting pattern reduces the need to communicate how a service works between organizations. The input specifications usually differ based on the input type itself. Below is an example of a custom input and data frame input specification:
from model_api_json_input_validator import ModelApiJsonInputValidator
from model_api_json_validator import ModelApiInputValidator
from bentoml.adapters import DataframeInput

@env(infer_pip_packages=True)
@artifacts([
   ...
])
class ModelApiService(BentoService):
    # 커스텀 인풋 명세 예시
    @api(input=ModelApiInputValidator(
             http_input_example=[{"feature1":0.0013,"feature2":0.0234 ... }],
             request_schema= {
                  "application/json": {
                  "schema": {
                     "type": "object",
                        "required":  ["feature1", "feature2", ... ],
                        "properties": {
                          "feature1": {"type": "float64"}, "feature2": {"type": "float64"}, ...
                         },
                      },
                    }
                 }),
         output=JsonOutput(),
         route="v1/custom_input/predict",
         mb_max_latency=200,
         mb_max_batch_size=500,
         batch=False
        )
    def predict_custom_input(self, df: pd.DataFrame):
        ...
        return result

    # 데이터 프레임 인풋 명세 예시
    @api(input=DataframeInput(
            orient = "records",
            colums = ['feature1','feature2', ... ],
            dtype =  {"feature1":"float64", feature2":"float64", ... }),
         output=JsonOutput(),
         route="v1/dataframe_input/predict",
         mb_max_latency=200,
         mb_max_batch_size=500,
         batch=False
        )
    def predict_dataframe_input(self, df: pd.DataFrame):
        ...
        return result
If you look at the Swagger UI below, you can see that Example Value and Schema are presented according to our specification .
Batch Serving#
In addition to online serving, BentoML can also serve models for batch predictions. By sending many inputs at the same time and configuring the batch feature, the inputs will be combined and passed to the internal ML framework which will typically have a batch interface implemented by default. As shown earlier, the batch feature is controlled using the batch decorator in the @apiparameter. Additional batching parameters are configurable by setting the mb_max_batch_size and mb_max_latency parameters.
@env(infer_pip_packages=True)
@artifacts([
    KerasModelArtifact('keras_model'),
    XgboostModelArtifact('xgb_model'),
    PytorchModelArtifact('pytorch_model')
])
class ModelApiService(BentoService):

    @api(input=ModelApiInputValidator(),
         output=JsonOutput(),
         route="v1/service_name/batch",
         mb_max_latency=200,     # micro batch 관련 설정
         mb_max_batch_size=500,  # micro batch 관련 설정
         batch=True              # batch 관련 설정
        )
    def predict_v1_batch(self, df: pd.DataFrame):
        ...

        # keras_model 예측
        keras_output = self.artifacts.keras_model.predict(df)

        # xgb_model 예측
        xgb_output = self.artifacts.xgb_model.predict(xgb.DMatrix(df))

        # pytorch_model 예측
        pytorch_output = self.artifacts.pytorch_model(torch.from_numpy(df))

        # 예측 결과 후처리( 최소 O(n)의 작업 )

        # 결과 Return
        return result
Depending on the type of service, offline serving may be required. Serving online is not always efficient. In BentoML, the return type is List in the case of batch processing. That is, the number of inputs and the number of outputs are equal. In the example above, prediction results are returned as different data types for each framework. O(n) loops are performed to combine these results in the post-processing step. I think this is inefficient for real-time services where latency is important. If the API becomes complex, it would be better to manage the online and offline serving separately. For large offline batches, a scheduler like Airflow might be more efficient from a performance perspective.
Packaging And Dev Environment Testing Capabilities#
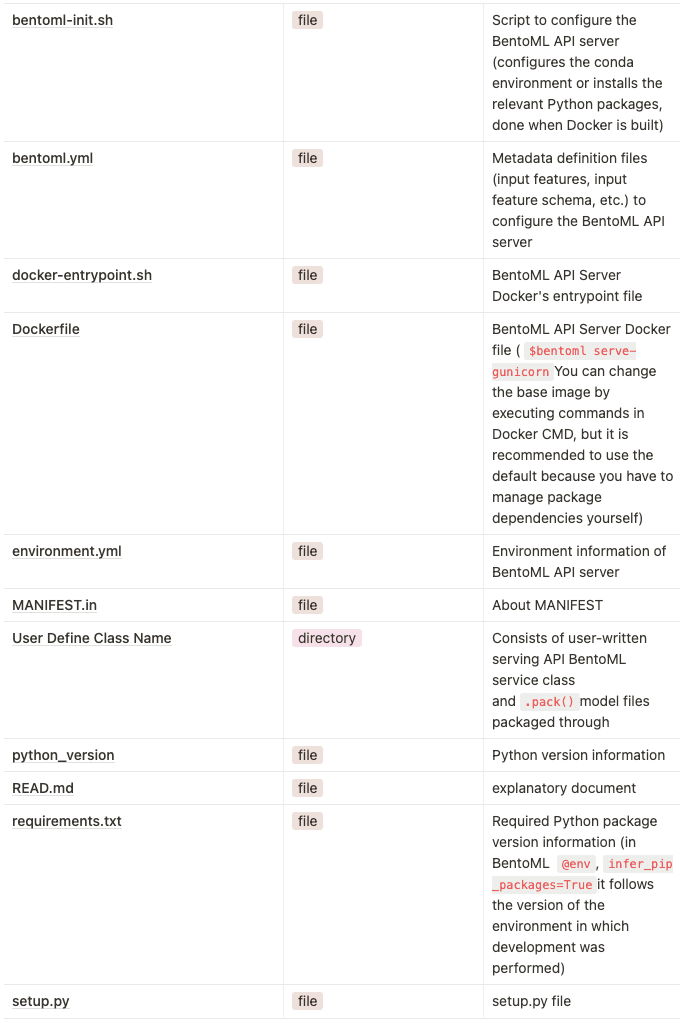
Now that we have finished developing our API, we’ll need to package it. In order to configure a serving API, you will need to combine a variety of different components starting with the Python scripts that we built to define the service. However, it doesn’t end there. You’ll also need the trained model file which we’ll need to download from MLFlow. You’ll also need the metadata that contains the specification for the serving API as well as all of the frameworks and library versions that were used. The process of compressing all of these pieces into one file can be understood as packaging. BentoML makes this process very easy by compressing everything into one tar.gz file.
In addition, a variety of methods are available for unit testing the serving application once it’s been packaged. I will share the easiest method that I’ve found. The code below shows a BentoML script which I created to import our service and pack it with the various models that are required. You can pack models which are available locally or ones that are downloaded from a remote location. Once the Bento is packed, you can run it locally or upload it to BentoML's model management component, called Yatai.
# BentoML service packaging
from model_api_service import ModelApiService
model_api_service = ModelApiService()
model_api_service.pack("keras_model", {"model": keras_reconstructed_model, "custom_objects": custom_objects})
model_api_service.pack("xgb_model", xgb_reconstructed_model)
model_api_service.pack("pytorch_model", pytorch_reconstructed_model)

# BentoML Package Upload to yatai server
saved_path = ensemble_churn_predict_service.save()

# dev server start
ensemble_churn_predict_service.start_dev_server(port=5000)

# dev server stop
ensemble_churn_predict_service.stop_dev_server()

# Send test request to dev server
import requests
response = requests.post("<http://127.0.0.1:5000/v1/service_name/predict>", data='[{"feature1":0.0013803629264609932,"feature2":0.023466169749836886, ... }]')
print(response)
print(response.text)
As a unit test, I am easily able to call start_dev_server() which can run BentoML in a local environment or Jupyter notebook environment. I’m able to directly test the implemented API without any additional steps which I think is a useful method for data scientists who are not familiar with Docker or running web services.
Package File Organization And Description#
After unzipping the package, it consists of the following files.
Logging#
Log management is an essential feature when deploying and operating a serving API in production. Since BentoML does not provide a log management feature, we chose Filebeat to collect logs separately. We chose Filebeat because we needed a lightweight solution that makes collecting logs easy. BentoML leaves the following logs under /home/bentoml/logs/* in the Docker container.
• active.log – BentoML CLI log along with the Python log itself
• prediction.log – Log of inferences and input requests (wait time, request_id, inputs and outputs)
• feedback.log – Feedback log for inference results
If you require business logic related logging you can access the logging component using the following code as a part of your serving API:
import logging
bentoml_logger = logging.getLogger("bentoml")
bentoml_logger.info("****** bento ml info log *******")
To configure Filebeat as part of our service, we added the following command to the Dockerfile that we use for deployment. We start the Filebeat process in the docker-entrypoint.sh script so that it runs every time the container starts. This seems like a process that can be automated in the future at the CI stage. Filebeat can output to many different locations, so choose the places that make the most sense for your situation.
# 기존 DockerFile 내용

# logging process를 위한 추가 된 부분
RUN wget <https://artifacts.elastic.co/downloads/beats/filebeat/filebeat-{version}-linux-x86_64.tar.gz> -O /home/bentoml/filebeat.tar.gz
RUN tar -zxvf /home/bentoml/filebeat.tar.gz
RUN mv filebeat-{version}-linux-x86_64 filebeat
COPY --chown=bentoml:bentoml filebeat_to_secure_kafka.yml ../

# 기존 DocekerFile 내용
USER bentoml
RUN chmod +x ./docker-entrypoint.sh
ENTRYPOINT [ "./docker-entrypoint.sh" ]
CMD ["bentoml", "serve-gunicorn", "./"]
Prometheus Monitoring#
If configured, BentoML exposes a Prometheus metrics endpoint that you can easily integrate with your dashboards. Below is a screenshot of a few of reports, visualizing different metrics provided by this endpoint. By dividing the metrics between endpointand http_response_code, you can view the total number of incoming requests, total errors, and even see the amount of micro-batching that is occurring.

Conclusion#
In this article I presented an overview of the features of BentoML and why I chose it as our MLOps model serving tool. In the continuation of this post, I will talk about the 4 different ways to deploy BentoML to Kubernetes and will share some performance experiments that we ran on our service once it was deployed. Thank you for reading!
BentoML Editor’s Note: 감사합니다 to the team at Line for contributing to the community. We’re excited to continue our work with the Line team and build a better framework as they discover new use cases.
The sample code from this blog post is made for 0.13 version. For the latest documentation checkout: https://docs.bentoml.org/en/latest/